Sunday, August 06, 2006
Tuesday, July 18, 2006
We got a Ticket!
Great rejoicing here this week as Harry now has his ticket - a lovely crisp computerised A4 MOT certificate!!!
All is well, now we can get him taxed and we'll be on the road again.
The next "Big job" will be sorting a crack in the nearside cylinder head - hopefully that can wait a few weeks while we save up... :-/
The promised step-by-step on the wiper motor follows shortly - honest!
Monday, July 17, 2006
The Wiper Motor and how to change it
The wiper motor in a type 2 is located behind the dash and requires a lot of fastenings to be undone in order to gain access and remove and refit the motor and/or mechanism. It's not hard, but it's a bit long winded and it has a really drastic look and feel to it, but hopefully this article will save a few other people some of the headaches I had when I did it.
Safety first: Take the earth strap off the battery or remove the battery all together - you don't want to add sparks to your problems - you've got enough problems already if you're having to do all this.
So, first undo the 4 screws that hold the instrument panel onto the dashboard - remember to catch the clips that fall out from behind the dash and keep them all very safe. The original handy hints I was given suggest passing the instrument panel back through the aperture, but there's more to do yet...
Now undo the small screws that run along just by where the dash meets the screen - there's about 6 of these.
There are 2 big
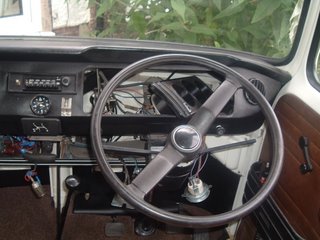 bolts that hold the top steering column bracket onto the dash, remove these too. Yes the column now waggles about in a scary manner, but there's no harm being done. NB If this goes on any length of time, you WILL find yourself getting back into the van and it WILL scare yourself half to death when you grab the steering wheel to help pull yourself in and it moves!
Chock the van wheels and take off the handbrake (and but it in gear too if you like). Remove the two screws that attach the handbrake to the dash. There's a third nearby that attaches the heater controls - take that one off too.
Now the 4 main screws, 2 at either end of the dash in the door frames, can come out - at this point the dash is loose and will start to flop about. However, we need to go back to the instrument panel - pull the 3 plastic heater controls off the metal arms. I had to reach in and push from behind with a screwdriver to shift some of mine. Don't pull them too hard, they will snap. This may allow you to pull out the panel, but I had to take one of the instruments out too, this will depend on your configuration. I also unscrewed the speedo drive before getting everything out and threading it back through the aperture.
Now the dash can be lifted up and towards you from either end - this is a 2 person job really if you want it to come right out. I didn't, only needing to get to the wiper motor and mechanism behind, which is now clearly visible. NB the lifting up bit is to clear the plastic airvent channels which you need to remember to locate back into the right holes when you put it all back.
The motor has a plastic clip with all the wires on which can be pulled off, then there is a single bolt holding it into the bulkhead. The wiper arms and the nuts behind them also locate the mechanism onto the bulkhead and all need to be removed. Once all these are off, the mechanism pulls back so that the drive shafts come back inside and the whole thing can be lifted out carefully. I think I found it easier to rotate it horizontally, moving the top towards the screen so that the drive shafts end up pointing towards you.
In the best of traditions, replacement is a reversal of the procedure! The only real problems I had putting it all back were the 4 clips that hold the instrument panel in - they are quite a complex maneuver to hold steady while you screw the screws back in. I removed the ashtray
housing to assist here - it's one screw at the top after you pull the drawer out.
There you go - I'm happy to accept comments, corrections and questions - I'll do my best to answer based on these recent experiences! Either use the blog comment mechanism or email me: john.sharp@zen.co.uk
Saturday, July 08, 2006
Songs From A Van
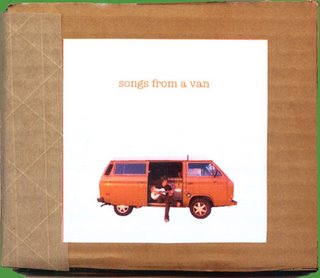
We recently came across Sebastian Clark, all the way from South California and on the UK leg of his "Songs From A Van" tour. Sebastian wrote recorded and manufactured his CD while touring in his VW Camper and is well worth a listen, for Sebastian has a sound that is pretty unique and it's delivered with quite some panache.
He's gone back home to his van now, but the CD is still available.
Friday, July 07, 2006
Size is everything after all
Well now, it's taken 3 replacement wiper motors, 3 fuses (2 16 amp and one, correctly, 8 amp) and now 2 new wiper blades, but we now have working wipers for the first time for ages.
Size matters? Well apart from having the correct fuse installed to protect the motor, its most useful to have the correct length wiper blades fitted. It came to light when I finally managed to bodge together bits of the wiper motors I had to make one that worked and then tried to refit the wipers - nothing I did could prevent the blades from catching the windscreen rubber seal - so I consulted Haynes and the Owners Manual - no joy - it was the old Just Kampers catalogue that actually recorded the 16" requirement - I suppose you can tell what size to get when you are replacing worn ones - so how we came to have ones that were a good inch and a half oversize is anybody's guess.
So to recap, the oversize wiper blades catching on the screen rubbers probably overloaded and overheated the motors, the heat softened the plastic cog which eventually failed, not helped by the over-rated fuse which didn't blow under the increased load. Meantime the catching has also filed down the splines in the wiper arm cones, so they tend to slip if they do catch on anything, often leaving the wipers pointing towards the pavement! Result - misery.
"These are the things, these are the things, the things that dreams are made of....."
Nightmares more like - we'll get Harry his MOT next week, then we'll have to address the low compression and blowing cylinder head ......
Tuesday, July 04, 2006
Wash and wipe
It's been a long road, but I think we are nearly there and the MOT is nearly attainable.
I have installed an electric screen wash kit - a great idea this - it comes in a freezer bag with all the bits you need and a sheet of clear instructions, goes together easily and all for under £20 from T2 Customs - so we now have a posh centre off switch which provides a healthy whir and a constant stream of water onto the screen.
So far as the wiper motor is concerned there is some progress - so a synopsis:
The motor has failed twice due to the drive shaft breaking the plastic gear.
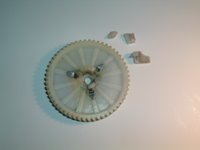
The problem seems to be that the mechanism jams and then the motor carries on working, chewing the point of least resistance - a plastic cog in an otherwise metal drive chain.
The mechanism is not seized and there is noapparentt problem under the dash - nothing snags the mechanism.
I think that part of the problem is that the fuse was too high a rating (16 amp rather than 8 amp) and should have blown much earlier than it did, possibly preventing the damage. I have rectified this!
After much ado I now have a working motor/mechanism combination which isn't quite right, I need to align the crank arm tomorrow to match the park position.
It now seems likely to me that the problems are being caused by the wiper arms having no splines left in the cone, allowing them to rotate around the drive shaft and then come into contact with the screen rubbers - thus allowing further rotation on the shaft.
Thursday, June 29, 2006
Other Peoples Ride's #1
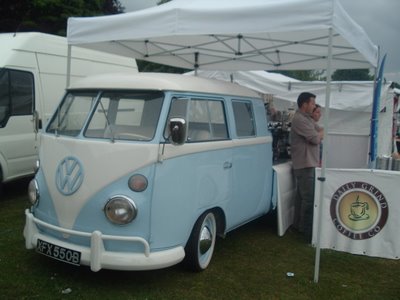
From time to time I will feature other vehicles that catch my eye - here is the first: Its a crew cab with a lovely paint job and with a rather sophisticated kettle bolted onto the rear deck! Seen here at Africa Oye! 2006 - the guy with lots of coffee to sell said that it wasn't finished yet, but it would be out most weekends over the summer.
