The Wiper Motor and how to change it
The wiper motor in a type 2 is located behind the dash and requires a lot of fastenings to be undone in order to gain access and remove and refit the motor and/or mechanism. It's not hard, but it's a bit long winded and it has a really drastic look and feel to it, but hopefully this article will save a few other people some of the headaches I had when I did it.
Safety first: Take the earth strap off the battery or remove the battery all together - you don't want to add sparks to your problems - you've got enough problems already if you're having to do all this.
So, first undo the 4 screws that hold the instrument panel onto the dashboard - remember to catch the clips that fall out from behind the dash and keep them all very safe. The original handy hints I was given suggest passing the instrument panel back through the aperture, but there's more to do yet...
Now undo the small screws that run along just by where the dash meets the screen - there's about 6 of these.
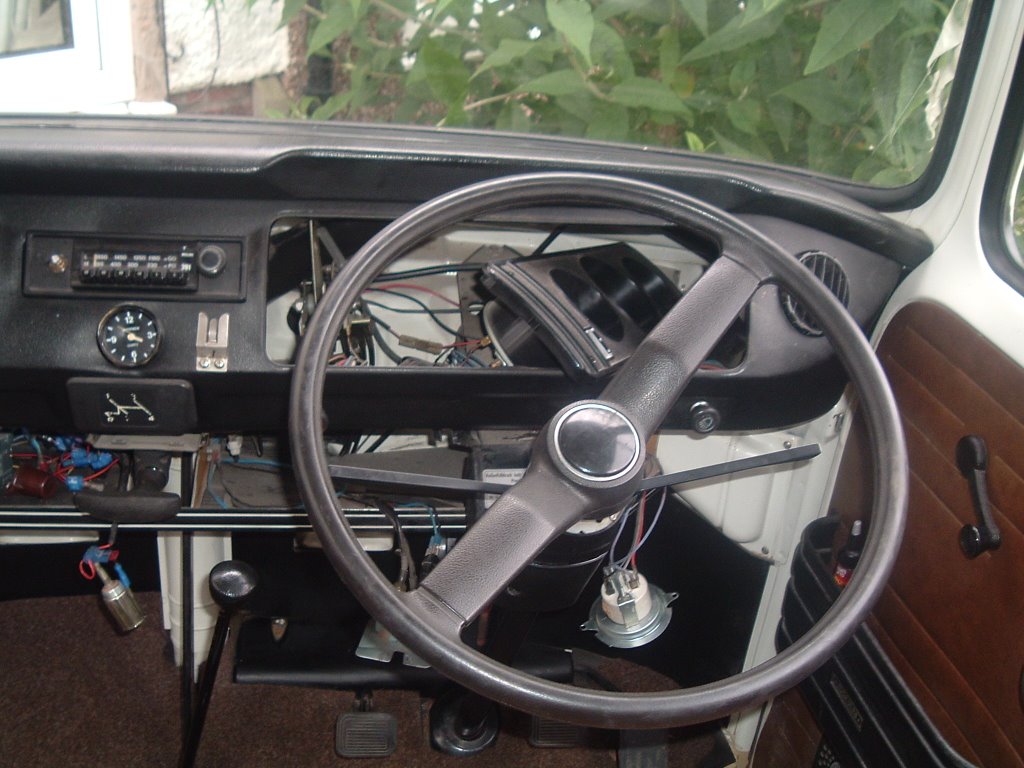
There are 2 big
 bolts that hold the top steering column bracket onto the dash, remove these too. Yes the column now waggles about in a scary manner, but there's no harm being done. NB If this goes on any length of time, you WILL find yourself getting back into the van and it WILL scare yourself half to death when you grab the steering wheel to help pull yourself in and it moves!
Chock the van wheels and take off the handbrake (and but it in gear too if you like). Remove the two screws that attach the handbrake to the dash. There's a third nearby that attaches the heater controls - take that one off too.
Now the 4 main screws, 2 at either end of the dash in the door frames, can come out - at this point the dash is loose and will start to flop about. However, we need to go back to the instrument panel - pull the 3 plastic heater controls off the metal arms. I had to reach in and push from behind with a screwdriver to shift some of mine. Don't pull them too hard, they will snap. This may allow you to pull out the panel, but I had to take one of the instruments out too, this will depend on your configuration. I also unscrewed the speedo drive before getting everything out and threading it back through the aperture.
Now the dash can be lifted up and towards you from either end - this is a 2 person job really if you want it to come right out. I didn't, only needing to get to the wiper motor and mechanism behind, which is now clearly visible. NB the lifting up bit is to clear the plastic airvent channels which you need to remember to locate back into the right holes when you put it all back.
The motor has a plastic clip with all the wires on which can be pulled off, then there is a single bolt holding it into the bulkhead. The wiper arms and the nuts behind them also locate the mechanism onto the bulkhead and all need to be removed. Once all these are off, the mechanism pulls back so that the drive shafts come back inside and the whole thing can be lifted out carefully. I think I found it easier to rotate it horizontally, moving the top towards the screen so that the drive shafts end up pointing towards you.
In the best of traditions, replacement is a reversal of the procedure! The only real problems I had putting it all back were the 4 clips that hold the instrument panel in - they are quite a complex maneuver to hold steady while you screw the screws back in. I removed the ashtray
housing to assist here - it's one screw at the top after you pull the drawer out.
There you go - I'm happy to accept comments, corrections and questions - I'll do my best to answer based on these recent experiences! Either use the blog comment mechanism or email me: john.sharp@zen.co.uk
posted by John Sharp @ 6:34 AM
![]()


0 Comments:
Post a Comment
<< Home